Wednesday, April 29, 2009

Seeing spots part 5 - white markings

It has now been several days since my last post. If you are wondering why that is, the answer is simple. The step that I'm about to show you takes forever! It's long and tedious and I hate it. There. I've said it. You've been warned. So let's continue.

The time has come to paint in Scarlett's blanket and other large areas of white, but not the roaning. We'll leave the roaning until the next step, and before you get too excited: Roaning is also very tedious.

If you are painting this horse with ambitions to take it to a live show, you probably already know that brush marks are the enemy. That's the reason why we can't just take some thick white paint, brush on one coat, and continue on our merry way. Instead, we're going to thin that paint down with water until there is no possible way that it can have even the faintest impasto effect (impasto basically means paint that is raised above the painting surface, think Van Gogh and you'll be able to picture it). You'll want to use a warm white, meaning one that doesn't have bluish tones. Titanium white of any brand is not a good choice. It just doesn't look that natural. Chroma makes a very nice warm white. Lately, I've been using Howard Hues' equine white. We are going to thin this white down until it is about the consistency of skim milk.

Go back to your photo references and find all of the areas with solid or near solid white and paint a very thin coat in those places on your model, working around the spots that you made in the last step. Just make sure that it is thick enough to actually be easily visible once dry. I've made that mistake and it can lead to an epic headache when you go to apply the second coat. Now go over those areas again...and again...and again. Keep adding layers until you either go mad or have a nice solid white, whichever happens first. You may find that some of the lower layers want to come off as you are painting over them. The instant you see that happening, put the horse down and walk away. When you come back the next day, the paint should have set up sufficiently to allow you to continue. If it has not, a very light coat of Testor's Dull Cote, should seal it well enough for you to continue to work. (Please don't substitute another brand of sealant here if you can avoid it. Very few brands have enough tooth to allow you to continue working. Also, don't try workable fixative even though it claims you can work on top of it. Workable fixative is a big fraud in my opinion.) Here is how the process looked on Scarlett. I photographed her every one to two coats:

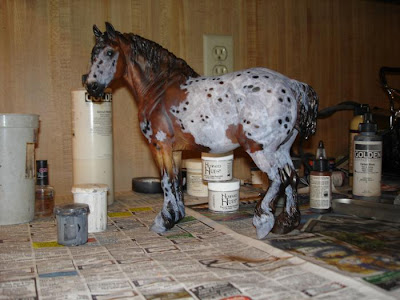


The white markings look too strong at this point, but we aren't going to worry about that. We'll use the roaning in the next step to blend and soften and all will be well.

Friday, April 24, 2009

Seeing spots part 4 - Spots!

Finally, it's time to add some spots! One would figure that you'd paint the white blanket first and then add the spots later. I prefer to paint my blankets around the spots. The reason being that the airbrush is very likely to spatter and overspray a little bit as you do this and there is no hiding that on a white background. You can save yourself hours of grief by painting your spots first.

Let's start with a few guidelines (Note that I said "guidelines", not "rules". It's very difficult to find hard and fast rules where horses are concerned. We follow the pirate's code around here!) about Appaloosa patterns:

1. Appy spots are not perfectly round. This is nature we are talking about here. Most spots are more of an oval and they frequently have ragged ends. They also vary in size.

2. Appy spots follow the hair pattern in a general way. Horses' coats do not grow straight from nose to tail. There are curves. There are cowlicks. I strongly advise you to go out and look at a real horse to learn where the hair pattern lies. I have yet to find a really good chart with this information, so I'm afraid you'll have to go to the barn and make a research project out of it. You are going to need this information later too.

3. Most Appaloosas have some spots that are darker than the body color. Often the majority of their spots are like this. Also, they are not necessarily all the same color.

4. Spots like to cluster. They will appear in small groups, they'll overlap, they might even line up in places. (Be careful with that last one. Sometimes what exists in life looks fake when placed on a model.)

Bear all this in mind as you paint and stick to your reference photos and hopefully you will end up with a lifelike Appaloosa, not a polka-dotted fantasy horse!

Now, on to Scarlett. I've loaded my airbrush with raw umber again and, using the same fine spray that we made our flowers with, have placed all but the tiniest spots where I want them.


Remember what I said about all spots not being the same color? Now I'm going to take some black and darken most of the spots on the upper half of her body. Since the color was already loaded in the airbrush, I went ahead and added the black points that will make her into a bay from this strange brownish-red color. I darkened the skin closest to her eyes, mouth, and nostrils as well. Now we have to let the paint set for at least few hours and we can start adding white.

Sunday, April 19, 2009

Seeing spots part 3 - shading

I'd like to introduce you to a couple of concepts that you won't hear much about outside of artistic circles, namely scumbling and glazing. Most of the time when we work with an airbrush we are glazing: adding color in transparent layers so that the underpainting shows through. If you start with lighter colors and layer on the darker colors transparently, you'll end up with a lovely glowing color to your horse. There is, however, such a thing as too brilliant. Here is Scarlett shaded with a glaze of the same burnt sienna we used for the dappling.


Here she is with yet more glazing of her darker areas, this time with Golden brand raw umber (I wish they made a burnt umber in their airbrush line, but alas, they don't.)


Her color is now rich, glowing, lovely, and pretty unrealistic to be honest. So we scumble. A scumble is the polar opposite of a glaze. This time we layer on an opaque color, often lighter. The end result is dull and lifeless but much more realistic. Use a very light touch here or you'll make a hideous mess out of your horse!

Mix up an opaque light gray about the color of the sky on a drizzly day and apply it ever so lightly in a broad spray along the body just below an imaginary line that would divide the profile in half from chest to tail. Hold the airbrush way back from the horse, at least 6-8 inches away if not more and make it quick. Give another light brush to the high point of the neck muscles. While you have this color in the airbrush, go ahead and use it to paint the skin around the eyes and muzzle, inside the ears, and between the back legs.

Now add some black to that gray until it is more like the color of very ominous clouds preceding a major thunderstorm and just as lightly scumble this color onto the areas of deepest shadow or darkest color. This much darker gray will now be used on all the skin areas, leaving just a bit of the lighter gray showing where it blends into the coat color.

My flash has really picked up the gray on Scarlett. It isn't as prominent in person. Try not to let it look this obvious on your horse.


Our next step will be to add the black points that will make the horse into a bay, then on to the spots! (Yes, spots first, then blanket. Trust me.)

Seeing spots part 2.5 - more dapple advice

I've just been asked a question about dappling via email that I'd like to share the answer to here. The artist asked for help in achieving the fine line needed to make the flowers. Like myself, she is using an Iwata Eclipse airbrush (As far as I'm concerned, there is no other brand. If you are using one of those clunkers that starts with the letter, B, P, or A, you have my sympathies.) and the following advice is geared to that brand:

Is your Iwata one of the gravity fed models? Gravity fed makes everything easier in my opinion. Assuming it is, step one with any airbrush issue is always to give the airbrush a thorough cleaning. Disassemble it and soak all of the parts in a mix of hot water and brush soap (I like Mona Lisa's Pink Soap which you can find at Michael's) for anywhere from a couple of hours to overnight. Then get in there with a paint brush or a pipe cleaner or an old needle or whatever it takes and get every bit of old paint out. Also, I will occasionally send mine back to the Iwata factory for a tune up which isn't terribly expensive.

Once the airbrush is pristine, it's time to start blaming the paint. What brand of paint are you using? I use a bunch of different brands, but they all need to be diluted except for the Golden Airbrush Paints. Your paint may be too thick (or too thin). Adjust the paint accordingly and try again.

If you can't blame the airbrush or the paint, it's finally time to look closer to home. The trick to getting a really fine line is balance. You need to find the sweet spot between pressing down for air pressure and back for paint release. I tend to go a little strong on the air and light on the paint. Sometimes it helps to blast a bunch of paint through in a broad spray to get things flowing and then back off until you get to a thinner line.

You can save yourself a lot of stress by practicing on paper instead of horses. I always start my line on the newspapers until I get it to the right size and then move over to the horse without taking my finger out of position. I never start drawing directly on the horse. That way lies madness. Please don't picture me just blissfully painting away with a tiny thin line the whole time. I lose it and have to go back to the paper about a hundred times in the course of a traditional paint job. Also, don't beat yourself up about keeping the line even, nothing in nature is really even. If you take a close look at my Scarlett, you'll see that there are plenty of splotchy areas among the flowers.

Your mantras here are clean, clean, clean, and practice, practice, practice!

Good luck and let me know if you are still having trouble!

Cara

Saturday, April 18, 2009

Seeing spots part 2 - Dapples

When I first started painting model horses, I tried painting the dapples as I saw them: lighter spots on top of the darker base color. They always looked more like polka dots. The secret to dapples, I later learned, is not to think in terms of light spots on a dark background, but dark circles on a light background. Later still, I learned that dapples are not round at all, nor are they symmetrical.

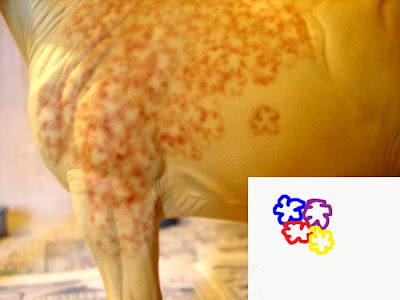
Here is how we will do our dapples. Take your airbrush and load it with burnt sienna. (I'm using Golden brand. It's unrivaled for smooth flow.) Using a very fine line, we are going to draw flowers, dozens and dozens of little flower outlines tucked into one another. I've tried to show in my rainbow colored graphic the basic shape that you're looking for. Also notice the one freestanding flower on Scarlett's side, placed there just for you. Please don't feel any obligation to make these neat, line them up, or draw them all the same size. Be a little chaotic with them, just like in nature.


Cover the entire main body of the horse, anywhere that dapples might possibly appear. I realize that this looks hideous and is waaaaay too many dapples. Trust me, most of them will be covered up, but this way you will have dapples where you need them because you really can't add more later and have them look as good. So here we have Scarlett in her floral garden stage:


Now you are going to switch to a broader line and outline all of those little flowers - only the outer edges. Reshape any of them that are too perfect. Now they should look like this:


Scary looking, isn't she? Don't worry, there really is a method to my madness. Next step: Shading.

Seeing spots


After painting my appaloosa Stormwatch, my inbox has been inundated with people asking how he was painted. While I did my best to answer everyone who asked as clearly as possible, it occurred to me that it is very difficult to take a finished artwork and explain it's genesis in any kind of a useful way. So, I've decided to create a tutorial. I will be painting Stacey Tumlinson's lovely draft resin, Scarlett, to a bay blanket Appaloosa with liberal roaning. (I found an AMAZING photo of a draft horse with Appy markings and just had to recreate it in model form!) I won't be sharing the reference photo as it isn't mine to share, but this horse doesn't have any atypical features for an Appaloosa (other than draft breeding) so it shouldn't be difficult to find photo reference of your own for anything we discuss. Blog posts will be added as Scarlett progresses so please feel free to grab a model or resin of your own and paint along. I'm going to assume that the horse has already been prepped and is ready for paint. We'll be using airbrushed acrylics, colored pencil, watercolor pencils, and pastels. Let's get started!

Step 1: Base coat and under shading.

I base coat nearly all of my horses in cream. The shade I'm using on Scarlett is a mixture of Howard Hues Equine White (any warm white or off white should do) and Jo Sonja's Nature's Palette Primrose. I thin the paint to airbrush consistency with Golden Airbrush Medium. You can use water, but it'll make clogs more likely. I also highly recommend that you filter the paint for possible clots that will tick off your airbrush. Remember: "If the airbrush ain't happy, ain't nobody happy!"

Give your horse about three coats, until the color is good and solid. Put her down and walk away until each coat is bone dry. This is VITAL! You will be handling this horse a lot as you roan it and if the paint isn't given time to dry THOROUGHLY between coats, I promise you, you will suffer for your sins! Scarlett is then shaded lightly with Chroma Nutmeg thinned with the medium.

By the way, please ignore my filthy workspace and cup of artist fuel (aka coffee). Next, we start making dapples! See you in a few hours!

Wednesday, April 8, 2009

Bitty Bosco


For once, I remembered to set my timer for the moment of a resin's release, so I have two of Morgen Kilbourne's Bitty Bosco resins. The first one is completed now and the second one... well, with all my custom orders to be finished, don't look for him anytime too terribly soon. I had all these great intentions of posting pictures of him at various stages of completion here on the blog with detailed explanations of the process, but I got so wrapped up in the painting of him, that I just kept on going and forgot entirely. I'll try for a little more self-discipline on the next horse. Anyways, Bosco is done and on eBay now:

http://cgi.ebay.com/ws/eBayISAPI.dll?ViewItem&item=230335966200

(By the by, the little mule from the last post is still available if anyone would like to contact me with an offer on him before he goes away.)