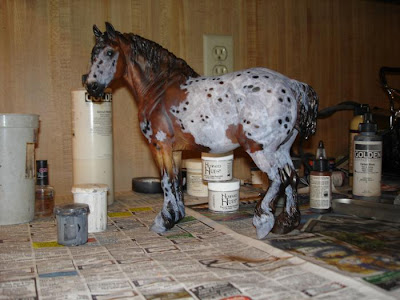
The time has come to paint in Scarlett's blanket and other large areas of white, but not the roaning. We'll leave the roaning until the next step, and before you get too excited: Roaning is also very tedious.
If you are painting this horse with ambitions to take it to a live show, you probably already know that brush marks are the enemy. That's the reason why we can't just take some thick white paint, brush on one coat, and continue on our merry way. Instead, we're going to thin that paint down with water until there is no possible way that it can have even the faintest impasto effect (impasto basically means paint that is raised above the painting surface, think Van Gogh and you'll be able to picture it). You'll want to use a warm white, meaning one that doesn't have bluish tones. Titanium white of any brand is not a good choice. It just doesn't look that natural. Chroma makes a very nice warm white. Lately, I've been using Howard Hues' equine white. We are going to thin this white down until it is about the consistency of skim milk.
Go back to your photo references and find all of the areas with solid or near solid white and paint a very thin coat in those places on your model, working around the spots that you made in the last step. Just make sure that it is thick enough to actually be easily visible once dry. I've made that mistake and it can lead to an epic headache when you go to apply the second coat. Now go over those areas again...and again...and again. Keep adding layers until you either go mad or have a nice solid white, whichever happens first. You may find that some of the lower layers want to come off as you are painting over them. The instant you see that happening, put the horse down and walk away. When you come back the next day, the paint should have set up sufficiently to allow you to continue. If it has not, a very light coat of Testor's Dull Cote, should seal it well enough for you to continue to work. (Please don't substitute another brand of sealant here if you can avoid it. Very few brands have enough tooth to allow you to continue working. Also, don't try workable fixative even though it claims you can work on top of it. Workable fixative is a big fraud in my opinion.) Here is how the process looked on Scarlett. I photographed her every one to two coats:


The white markings look too strong at this point, but we aren't going to worry about that. We'll use the roaning in the next step to blend and soften and all will be well.


Thanks so much for posting all this. I am learning quite a bit!
ReplyDelete