Wednesday, May 13, 2009

Scarlett is ending on eBay tonight


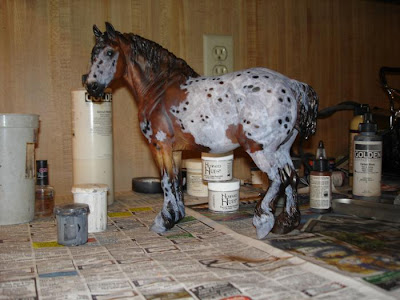
I'm so sorry that I forgot to post this information until the last day, but the Scarlett resin that I used in my recent tutorial is available for purchase on eBay. Her auction ends tonight! Here's the link:


http://cgi.ebay.com/ws/eBayISAPI.dll?ViewItem&item=230341972700


All of the pertinent info can be found there. Thanks for looking!

Friday, May 8, 2009

Seeing spots part 7 - Finishing touches

The most famous Appaloosa characteristic is, beyond doubt, the spots. Lesser known, but also important, are the visible white sclera around the eye, striped hooves, and mottled skin. I'm now going to show you how to create these effects starting with the eyes.

I like to build the eye up in layers. Step one is simple. Paint the eye white.


Next, add a pink spot in the front corner for the third eyelid/nicitating membrane. Dry brush a tiny bit or red on top of it to give the impression of capillaries.


In order to tone the whole thing down and make it more lifelike, go over the entire eye with a very thin wash of mostly water and a teeny tiny dab of Golden Airbrush Raw Umber.


Use the same color full strength for the iris and, while it is still wet (you'll have to move fast!), blend some metallic gold into the center. This is the secret to that lifelike sparkle.


Now make a horizontal bar of black for the pupil. I like to add a bit of metallic blue at the center for depth, but it's not mandatory.


On to the hooves. Apply loose chalk pastel using a paintbrush to any hooves you have painted white. You'll want to choose a dark gold or raw sienna. This is just a base so don't worry overmuch about what shade you choose.


Now take a colored pencil in a similar shade and draw some stripes onto the dark hooves. Be sure to vary your line. Some stripes should be fat, some thin, some clustered together, others off on their own. Symmetry in NOT your friend here! Just make sure that they follow the angle of the hoof wall exactly. You will do the same on the light hooves using a dark gray or black pencil. On the lighter hooves, I like to go over the stripes with pastel in a matching color. It fleshes them out a bit.


Finally, choose a dark reddish brown pastel color and go around all the hooves horizontally. You can use this same color to shade the undersides of any raised hooves.


The mottled skin around the eyes, muzzle, and dock area can make or break the whole look of your horse, but is actually very simple to create. You will need a pale pink or flesh colored watercolor pencil. My brand of choice is Derwent. Get the pencil nice and sharp and then briefly dip the tip into a cup of water. Using the damp tip, make little spots. Just like the hoof stripes, you'll make different sizes, some you'll spread out, and some you'll cluster. Allow me to reiterate: Symmetry = Bad

Once the mottling has dried, brush a thin coat of red pastel over it, and then tone it down with another coat of pastel, this time in black or a very dark gray. That last bit is important. I've seen a lot of lovely appaloosa ruined by skin mottling that dominates the entire face by being too bold.


That's it. Give your horse a good once over for any damage resulting from handling (unavoidable), spray him/her with the sealant of your choice, and top it off by glossing the eyes, hooves, and nostrils. Your Appaloosa is now complete!


Thursday, May 7, 2009

Seeing spots part 6 - Roaning

If you wear glasses, it's time to put them on. We are going to get into the very intense detail now. Do you remember how I said in the last post that white markings take forever? What we are about to do takes longer still.

We're going to add roaning to our horse. On a real horse, roaning refers to scattered white hairs mixed into the main body color. On our model appaloosa, we'll be adding some colored hairs in as well, but in the same style. We'll also be using the roaning to make some more spots. This is the look you'll be aiming for:


You have a choice here. You can use a tiny paint brush and very thinly diluted paint, or you can use professional quality colored pencils with a VERY sharp point. On Scarlett, I'm using Prismacolors which I have come to prefer. In the interest of letting you make an informed decision, here is another Tumlinson sculpture, Desperado, roaned using a paint brush:


Starting on the dark areas of the body with a white or light color (I used mostly French Grey 50% with some White and Putty Grey Prismacolors on my girl) and create a bunch of teeny tiny strokes following the hair pattern. The mane and tail are done the same way, you'll just make each hair far longer.


You don't want all solid blocks of roaning here, make more spots by leaving some holes. Feel free to overdo it and leave tons of these holes, you can always fill some (or most, or all) of them in later with more roaning.


Some, but not all, of these holes can have a spot painted into them as well. You can also take your pencils and add some tiny spots wherever your reference picture or artistic sensibilities dictate. Just be sure to stick to the spot placement guidelines we went over earlier.


In areas where there are unbroken expanses of roan hairs, I like to make parts of the roaning more dense, even going so far as to scribble in blocks of white like a kindergartener with a crayon. Be careful with this, it's easy to overdo.

The trickiest part of all this will be when you need to follow a cowlick. The easiest way I've found is to outline the cowlick in roan hairs and then fill it in layer by layer as such:


When you hit the edge where the body color and the white meet, dig out some pencils that match the body color in that area and paint some hairs onto the white marking with them by way of blending. Scarlett is obviously not a horse groomed for a show, but a broodmare out in pasture, so I went over all of her white areas with hairs done in French Grey 50% and Putty Grey to make her look both shaggy and not so squeaky clean. You may or may not want to do this with your horse depending on the model you're using. Lastly, you can choose to halo your spots with a bit of light and dark hairs mixed together. I haven't done this to Scarlett yet, but probably will by the next time you see her. Here is Scarlett now:


The worst is now over. It's finally time to paint the finishing details!

Wednesday, April 29, 2009

Seeing spots part 5 - white markings

It has now been several days since my last post. If you are wondering why that is, the answer is simple. The step that I'm about to show you takes forever! It's long and tedious and I hate it. There. I've said it. You've been warned. So let's continue.

The time has come to paint in Scarlett's blanket and other large areas of white, but not the roaning. We'll leave the roaning until the next step, and before you get too excited: Roaning is also very tedious.

If you are painting this horse with ambitions to take it to a live show, you probably already know that brush marks are the enemy. That's the reason why we can't just take some thick white paint, brush on one coat, and continue on our merry way. Instead, we're going to thin that paint down with water until there is no possible way that it can have even the faintest impasto effect (impasto basically means paint that is raised above the painting surface, think Van Gogh and you'll be able to picture it). You'll want to use a warm white, meaning one that doesn't have bluish tones. Titanium white of any brand is not a good choice. It just doesn't look that natural. Chroma makes a very nice warm white. Lately, I've been using Howard Hues' equine white. We are going to thin this white down until it is about the consistency of skim milk.

Go back to your photo references and find all of the areas with solid or near solid white and paint a very thin coat in those places on your model, working around the spots that you made in the last step. Just make sure that it is thick enough to actually be easily visible once dry. I've made that mistake and it can lead to an epic headache when you go to apply the second coat. Now go over those areas again...and again...and again. Keep adding layers until you either go mad or have a nice solid white, whichever happens first. You may find that some of the lower layers want to come off as you are painting over them. The instant you see that happening, put the horse down and walk away. When you come back the next day, the paint should have set up sufficiently to allow you to continue. If it has not, a very light coat of Testor's Dull Cote, should seal it well enough for you to continue to work. (Please don't substitute another brand of sealant here if you can avoid it. Very few brands have enough tooth to allow you to continue working. Also, don't try workable fixative even though it claims you can work on top of it. Workable fixative is a big fraud in my opinion.) Here is how the process looked on Scarlett. I photographed her every one to two coats:


The white markings look too strong at this point, but we aren't going to worry about that. We'll use the roaning in the next step to blend and soften and all will be well.

Friday, April 24, 2009

Seeing spots part 4 - Spots!

Finally, it's time to add some spots! One would figure that you'd paint the white blanket first and then add the spots later. I prefer to paint my blankets around the spots. The reason being that the airbrush is very likely to spatter and overspray a little bit as you do this and there is no hiding that on a white background. You can save yourself hours of grief by painting your spots first.

Let's start with a few guidelines (Note that I said "guidelines", not "rules". It's very difficult to find hard and fast rules where horses are concerned. We follow the pirate's code around here!) about Appaloosa patterns:

1. Appy spots are not perfectly round. This is nature we are talking about here. Most spots are more of an oval and they frequently have ragged ends. They also vary in size.

2. Appy spots follow the hair pattern in a general way. Horses' coats do not grow straight from nose to tail. There are curves. There are cowlicks. I strongly advise you to go out and look at a real horse to learn where the hair pattern lies. I have yet to find a really good chart with this information, so I'm afraid you'll have to go to the barn and make a research project out of it. You are going to need this information later too.

3. Most Appaloosas have some spots that are darker than the body color. Often the majority of their spots are like this. Also, they are not necessarily all the same color.

4. Spots like to cluster. They will appear in small groups, they'll overlap, they might even line up in places. (Be careful with that last one. Sometimes what exists in life looks fake when placed on a model.)

Bear all this in mind as you paint and stick to your reference photos and hopefully you will end up with a lifelike Appaloosa, not a polka-dotted fantasy horse!

Now, on to Scarlett. I've loaded my airbrush with raw umber again and, using the same fine spray that we made our flowers with, have placed all but the tiniest spots where I want them.


Remember what I said about all spots not being the same color? Now I'm going to take some black and darken most of the spots on the upper half of her body. Since the color was already loaded in the airbrush, I went ahead and added the black points that will make her into a bay from this strange brownish-red color. I darkened the skin closest to her eyes, mouth, and nostrils as well. Now we have to let the paint set for at least few hours and we can start adding white.

Sunday, April 19, 2009

Seeing spots part 3 - shading

I'd like to introduce you to a couple of concepts that you won't hear much about outside of artistic circles, namely scumbling and glazing. Most of the time when we work with an airbrush we are glazing: adding color in transparent layers so that the underpainting shows through. If you start with lighter colors and layer on the darker colors transparently, you'll end up with a lovely glowing color to your horse. There is, however, such a thing as too brilliant. Here is Scarlett shaded with a glaze of the same burnt sienna we used for the dappling.


Here she is with yet more glazing of her darker areas, this time with Golden brand raw umber (I wish they made a burnt umber in their airbrush line, but alas, they don't.)


Her color is now rich, glowing, lovely, and pretty unrealistic to be honest. So we scumble. A scumble is the polar opposite of a glaze. This time we layer on an opaque color, often lighter. The end result is dull and lifeless but much more realistic. Use a very light touch here or you'll make a hideous mess out of your horse!

Mix up an opaque light gray about the color of the sky on a drizzly day and apply it ever so lightly in a broad spray along the body just below an imaginary line that would divide the profile in half from chest to tail. Hold the airbrush way back from the horse, at least 6-8 inches away if not more and make it quick. Give another light brush to the high point of the neck muscles. While you have this color in the airbrush, go ahead and use it to paint the skin around the eyes and muzzle, inside the ears, and between the back legs.

Now add some black to that gray until it is more like the color of very ominous clouds preceding a major thunderstorm and just as lightly scumble this color onto the areas of deepest shadow or darkest color. This much darker gray will now be used on all the skin areas, leaving just a bit of the lighter gray showing where it blends into the coat color.

My flash has really picked up the gray on Scarlett. It isn't as prominent in person. Try not to let it look this obvious on your horse.


Our next step will be to add the black points that will make the horse into a bay, then on to the spots! (Yes, spots first, then blanket. Trust me.)

Seeing spots part 2.5 - more dapple advice

I've just been asked a question about dappling via email that I'd like to share the answer to here. The artist asked for help in achieving the fine line needed to make the flowers. Like myself, she is using an Iwata Eclipse airbrush (As far as I'm concerned, there is no other brand. If you are using one of those clunkers that starts with the letter, B, P, or A, you have my sympathies.) and the following advice is geared to that brand:

Is your Iwata one of the gravity fed models? Gravity fed makes everything easier in my opinion. Assuming it is, step one with any airbrush issue is always to give the airbrush a thorough cleaning. Disassemble it and soak all of the parts in a mix of hot water and brush soap (I like Mona Lisa's Pink Soap which you can find at Michael's) for anywhere from a couple of hours to overnight. Then get in there with a paint brush or a pipe cleaner or an old needle or whatever it takes and get every bit of old paint out. Also, I will occasionally send mine back to the Iwata factory for a tune up which isn't terribly expensive.

Once the airbrush is pristine, it's time to start blaming the paint. What brand of paint are you using? I use a bunch of different brands, but they all need to be diluted except for the Golden Airbrush Paints. Your paint may be too thick (or too thin). Adjust the paint accordingly and try again.

If you can't blame the airbrush or the paint, it's finally time to look closer to home. The trick to getting a really fine line is balance. You need to find the sweet spot between pressing down for air pressure and back for paint release. I tend to go a little strong on the air and light on the paint. Sometimes it helps to blast a bunch of paint through in a broad spray to get things flowing and then back off until you get to a thinner line.

You can save yourself a lot of stress by practicing on paper instead of horses. I always start my line on the newspapers until I get it to the right size and then move over to the horse without taking my finger out of position. I never start drawing directly on the horse. That way lies madness. Please don't picture me just blissfully painting away with a tiny thin line the whole time. I lose it and have to go back to the paper about a hundred times in the course of a traditional paint job. Also, don't beat yourself up about keeping the line even, nothing in nature is really even. If you take a close look at my Scarlett, you'll see that there are plenty of splotchy areas among the flowers.

Your mantras here are clean, clean, clean, and practice, practice, practice!

Good luck and let me know if you are still having trouble!

Cara